The reverse side also has a reverse side.
~ Japanese Proverb
I've been having a wonderful time this weekend diving into the patterns in this book - one of my Christmas presents.
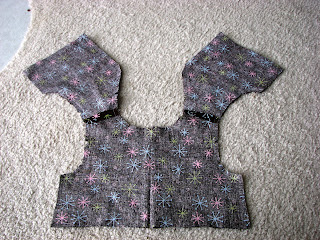
I started with a lined top for a toddler. Three of my friends at work have (or are about to have) a little girl and so I'm making 3 of these tops. The instructions for making the lined top are okay, but not well illustrated, and if you have never done this before it could be confusing. Here are some photos illustrating the steps using the 3 different tops that I am making:
After assembling the outside layer (front piece to 2 back pieces at shoulder seams) and the lining layer (same way), you lay them right-sides-together and stitch:
(a) the arm hole seams (but not the side seams)
(b) all the way up one back center edge, around the neckline and down the other back center edge
Do not stitch any of the bottom seams.
Then you turn it right side out by pulling each back piece through the opening in the shoulder.
And press it. :)
Here I've draped the shoulder over my ham and you can see the 2 side seams:
I stuffed some tissue paper inside, to show you how the side seams are open:
Imagine opening upwards the outside layer of each side seam and aligning those together in one long seam. That's what you are seeing below (sideways):
This gives you one long seam that aligns the sides of the outside fabric and the sides of the lining fabric and, once sewn, closes up the side inside and out. :)
Hopefully by next weekend I can show you the completed tops AND the matching skirts that I am making. :)
I hope you had a wonderful sewing weekend!


6 comments:
I got that book, too, but haven't made anything from it.
You should check out Pink Chalk Fabrics blog~ they made all the projects from the book and give little tips.It's awesome!
http://pinkchalkstudio.com/blog/one-yard-wonders-sew-along/
oh... love your little shirt, btw.
OMG, finally I understand how to sew it. I had a Simplicity pattern that I just could not understand. I wrote them & did receive an answer back. It was the same exact directions that were with the pattern. No help at all and I let them know. But this is so great. I actually want to give it a try again. Thank you bunches and bunches!
Thanks so much for this great tutorial. I am making a flower girl's frock and have made the bodice and tule skirt but I ended up sewing the shoulder seams last (duh!) because I couldn't fathom how to do this! Alas the bride changed her mind about using the satin with matt side as right side and now I have had to cut it all again to show shiny satin side as right side. At least my rework will now not be in vain, as I can make the second version properly. Thanks once again.
thank you for posting this - I am making a flower girl dress for a two year old using a beautiful satin and have been unable to work out which seams to sew in what order. Now I can see easily what needs to be done.
A great help!
Thank you so much for this tutorial. I have been making a flower girl frock for a 2 year old and haven't been able to work out which seams to sew in what order. And you have made it so easy to follow - great photos and great instructions.
Well done!
thanks for this tutorial - I am making a flower girl frock for a 2 year old and I was struggling. great photos and simple instructions.
good job!
Post a Comment