Trust yourself. You know more than you think you do.
~ Benjamin Spock
Well, my first Christmas present project (the wine totes) got off to a rocky start... I skimmed the instructions from front to back before doing anything, and was intrigued by the instructions for squaring off the bottom of the tote. I've made a handful of bags and learned various methods for forming bottoms - but these looked different. It appeared that there was only ONE step, and I was accustomed to doing each of the 2 corners separately.
Here is EVERYTHING in the instructions referring to making the bottom:

I didn't quite understand the instructions, but assumed that it would make sense when I actually followed them, and was happily anticipating learning a new, easier and possibly ingenious method. :)
Alas, it was not to be...
The first step was to fold the square piece of fabric in half and stitch along the side and the bottom, leaving only the top open. Next was to turn the fabric 90 degrees and open it up, forming a triangle at the bottom.
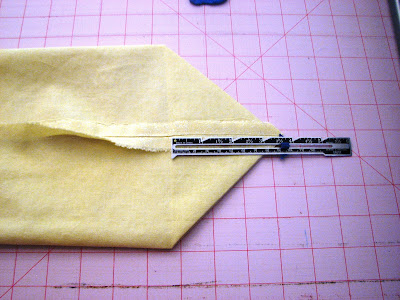
My first interpretation problem came when I was trying to decide where to measure the 3.5 inches. The picture seemed to indicate that it was from side to side on the tote. But the instructions said "...from the corner" I decided to follow the words and use what I thought was "the corner":

It turned out that my stitching line fell just before the start of all the folded over fabric, so that made me think that maybe this was right. I stitched the line and cut off the excess and couldn't wait to see the miraculous squared off bottom! Ta Da!

Ooops - that is not a squared off bottom.
Okay, back to the drawing board - apparently they DID mean from side-to-side, as illustrated in the drawing. I could do that:

I still didn't see how it was going to produce a cool, squared off bottom, and I was still excited to see. I stitched and cut and...

Huh?

What the heck?
Realization dawned. The instructions were fundamentally flawed and this was one case where I should trust my knowledge of how to make squared off bottoms. EACH corner had to be made separately:

I stitched the lines (3.5 inches from side-to-side) on EACH corner and trimmed the excess fabric:

Now, turn it right-side out and... voila!

Finally! :)
Other than that, the rest of the first wine tote came together pretty smoothly. My only other minor quibble was the length of the strap (10 inches). It might be a good length for the finished tote, but it was just a tiny bit too short to fit comfortably in place during construction. If I were to do this again, I'd probably go with 11 or 12 inches...
Only 8 more to go! ;)
I hope you had a wonderful sewing weekend and are ready for a new week... :)


3 comments:
Those instructions were a bit confusing. You ended up doing it the way I usually square corners and I think it is the way the instructions want you to do it too. Those are very cute wine totes! Well done!
Linda T
Just gorgeous!
I would probably make the straps long enough to go over my shoulder...but then, I am usually lugging 3 kids and way too much gear anywhere we go.
Instructions are not always written so one can understand them, and often are incorrect. That's why it's important to have a good knowledge of sewing before sewing!
Post a Comment